What Is the Best Shutter Angle for Drone Video?
What is the best shutter angle for drone video? It's a question that often comes up when you're trying to get that buttery-smooth, cinematic look. Getting it right means your footage won't feel jarring, and the motion of your drone or the scene it's capturing looks natural to the human eye.
For professional-quality drone video, aiming for a shutter angle that produces a specific amount of motion blur is key. As of 2026, most professional drone cinematographers rely on the "180-degree rule" as a baseline, which dictates a direct relationship between your frame rate and shutter speed. Let's break down how to achieve this.
Image source: Bing (Web (fair-use with source credit))
Understanding Drone Video Shutter Angle: Why It Matters for Motion
When you're flying a drone and recording video, what you're essentially doing is taking a rapid series of still photos and stitching them together. Each of those photos is captured during a tiny fraction of a second when the camera's shutter is open. The duration that shutter stays open is called the shutter speed, and how that relates to the overall time within each frame is the shutter angle.
Think of a full circle representing one full second of video. If the shutter is open for half of that second, that's a 180-degree shutter angle. This duration directly controls how much motion blur appears in each individual frame.
Too little motion blur, and fast-moving objects or drone movement can look choppy or "stuttery." Too much, and the image can become muddy and lose detail. Matching your shutter angle to your frame rate is how you control this perceived smoothness, making your drone footage look professionally produced rather than like home video.
The 180-Degree Rule: Your Starting Point for Smooth Footage
The 180-degree rule is the golden guideline for achieving natural-looking motion blur in video. It's a convention that filmmakers have used for decades, and it translates perfectly to drone videography. When you follow this rule, you're setting your shutter speed to be exactly twice your frame rate.
For example, if you're shooting at 30 frames per second (fps), your shutter speed should be 1/60th of a second. If you're shooting at 60 fps, your shutter speed should be 1/120th of a second.
This specific ratio creates a look that our brains are accustomed to seeing. It captures enough motion blur to make movement appear smooth and fluid, without blurring out critical details or making the footage look smeared. It's the standard for cinematic content, commercials, and most professional video production because it offers the best balance between detail and perceived motion.
While there are exceptions and creative reasons to deviate, understanding and applying the 180-degree rule is your essential first step to making your drone footage look polished and professional.
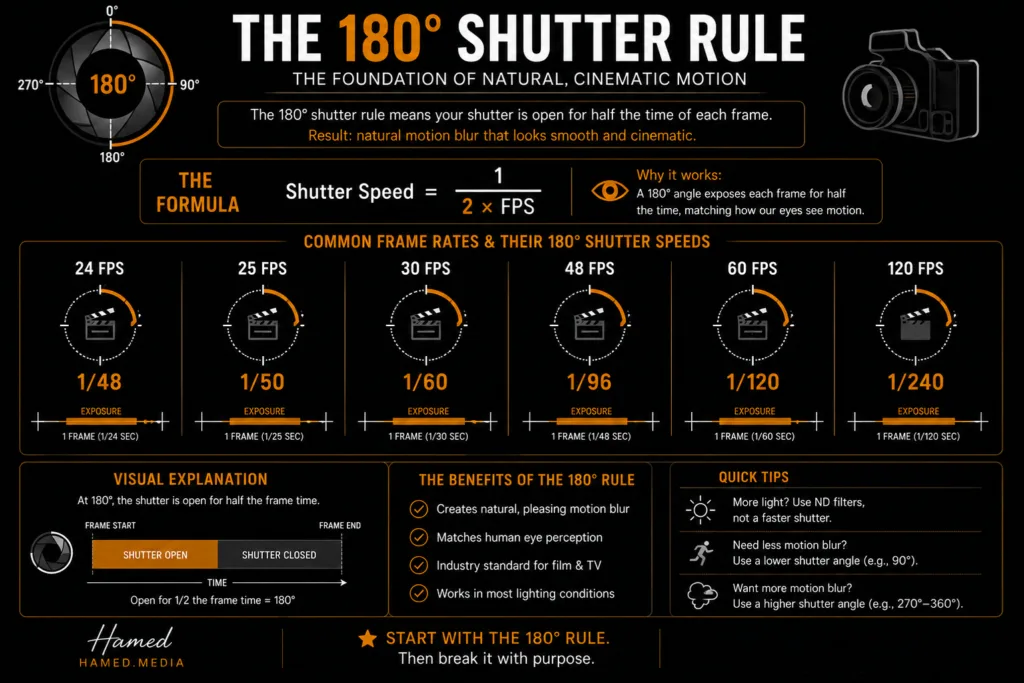
Image source: Bing (Web (fair-use with source credit))
Calculating the Right Shutter Speed for Your Frame Rate
To nail the 180-degree rule, you first need to know your video's frame rate (FPS). This is the number of still images your camera captures per second. Common frame rates for drone video include 24 fps (for a classic cinematic look), 30 fps (standard for broadcast and online video), and 60 fps (often used for smoother slow-motion).
Once you have your frame rate, the calculation for the correct shutter speed is simple: divide your frame rate by two to get your shutter speed denominator.
For instance, if your drone camera is set to 30 fps, you'll want a shutter speed of 1/60th of a second. If you're shooting at 60 fps, you'll aim for 1/120th of a second. Many modern drone cameras have an "auto" shutter speed setting that tries to follow this, but it's always best to take manual control for consistency.
This direct relationship ensures that each frame has the appropriate amount of motion blur, making fast pans or moving subjects look natural and pleasing to the eye.
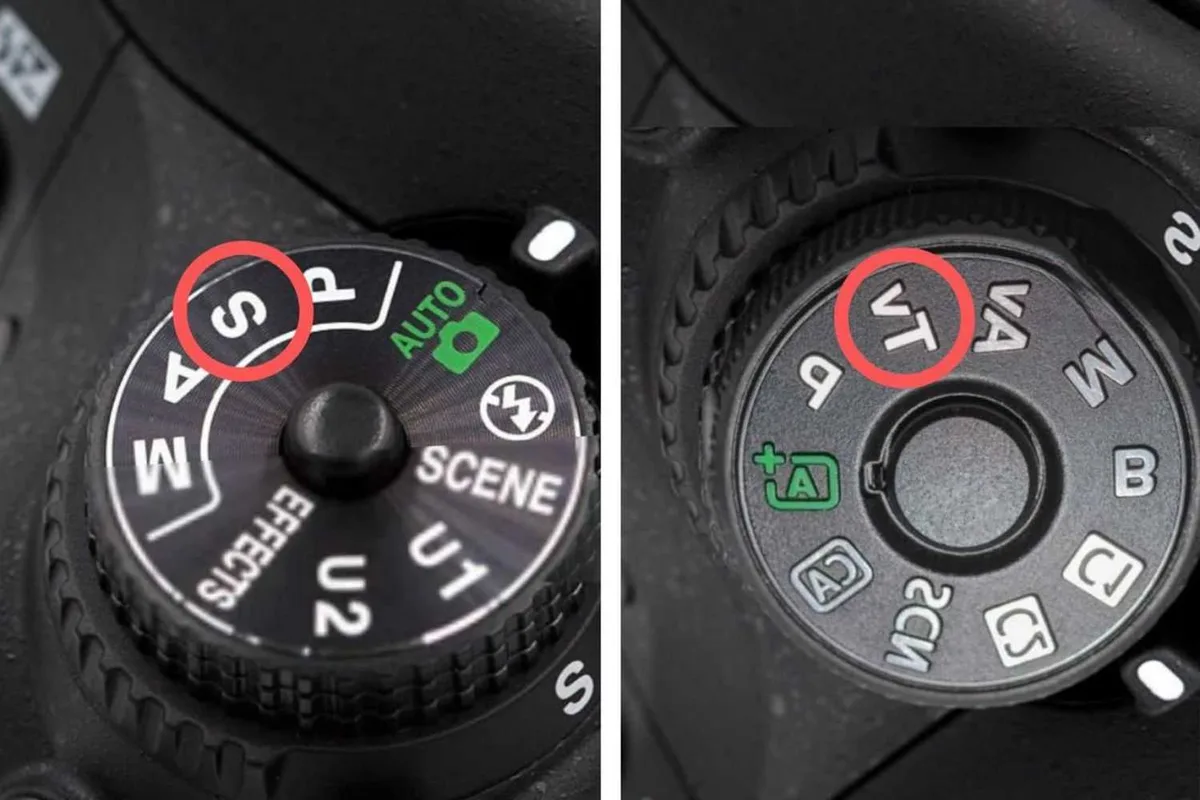
Image source: Bing (Web (fair-use with source credit))
The Formula: Keeping Motion Natural
The core formula for maintaining natural motion blur is straightforward:
Shutter Speed = 1 / (2 * Frame Rate)
Let's look at some common scenarios:
- For 24 fps: Shutter speed = 1 / (2 * 24) = 1/48 second. Most cameras offer 1/50 sec as the closest readily available setting.
- For 30 fps: Shutter speed = 1 / (2 * 30) = 1/60 second. This is a standard setting on most cameras.
- For 60 fps: Shutter speed = 1 / (2 * 60) = 1/120 second. Again, a common setting.
- For 120 fps (for slow-motion): Shutter speed = 1 / (2 * 120) = 1/240 second.
Using these precise shutter speeds ensures your footage has that sought-after professional look, making the motion feel integrated and smooth.
What If You're Not Shooting Cinematic?
While the 180-degree rule is excellent for cinematic looks, it's not the only option. If you're shooting content where absolute sharpness and detail in fast motion are paramount, say, for sports analysis or capturing rapid industrial processes, you might choose a faster shutter speed. This means a smaller shutter angle.
For example, if you need to freeze action completely, you might use a shutter speed of 1/500 sec or even faster. This would result in a much smaller shutter angle. The trade-off is significantly less motion blur, which can make fast pans or rapid drone movements appear jerky or unnatural to viewers accustomed to standard video.
In such cases, you're prioritizing freeze-frame clarity over fluid motion. However, for most storytelling and scenic drone footage, sticking close to the 180-degree rule is your best bet.
Adjusting Shutter Angle Beyond 180 Degrees
While the 180-degree rule is your bedrock for natural motion, sometimes you'll want to deliberately change your shutter angle to achieve a specific visual effect. This is where understanding how shutter angle impacts motion blur becomes crucial for creative control. Deviating from the 180-degree rule is a deliberate artistic choice, and it's important to know what outcome you can expect.
Choosing a shutter angle that's wider than 180 degrees (meaning a slower shutter speed for a given frame rate) will introduce more motion blur. Conversely, selecting a shutter angle less than 180 degrees (a faster shutter speed) will reduce motion blur, effectively freezing action more crisply. Most professional drone cameras allow you to adjust shutter speed directly, and by extension, you're adjusting your shutter angle.
It’s about knowing the tools and their effect.
Faster Shutter Angle: Capturing Sharpness
Opting for a faster shutter angle, which translates to a shorter shutter speed, is about freezing motion. If your drone is capturing a very fast-moving subject, or if you're performing an aggressive maneuver like a rapid snap zoom or a quick dolly-out, you might use a faster shutter speed to keep the image sharp. For instance, if you're shooting at 30 fps and decide to use a shutter speed of 1/250 sec instead of 1/60 sec, you're effectively using a much smaller shutter angle.
This technique is less common in typical scenic drone videography but can be useful for specific effects or when trying to capture fine details in high-speed events. The key thing to remember is that reducing motion blur this drastically can make the overall movement appear less fluid. For viewers, it might look a bit "digital" or even choppy if not handled carefully.
It’s a trade-off: you gain freeze-frame clarity, but you sacrifice the natural, flowing look of motion.
Slower Shutter Angle: Creating More Motion Blur
Going beyond the 180-degree rule with a slower shutter speed, which means a larger shutter angle, will deliberately increase motion blur. You might do this intentionally to create a dreamy, flowing effect, perhaps when filming smooth, sweeping shots over water or foliage where you want to emphasize the sense of continuous movement. For example, if you're shooting at 30 fps and decide to use a shutter speed of 1/30 sec, you're using a shutter angle larger than 180 degrees.
This technique can lend a very "filmic" quality, but it’s easy to overdo it. Too much motion blur can obscure details, make text unreadable, and cause fast-moving elements to look like indistinct streaks. It can also lead to banding in areas of high contrast, especially when combined with artificial lighting.
For drone work, it's generally best to use slower shutter speeds sparingly and with a clear creative intention, as the 180-degree rule usually provides the most universally pleasing result.
Dealing with Lighting: When to Use ND Filters
Now, here's where things get really interesting: what happens when you want to stick to your 180-degree rule but the sun is just too bright? You can't just stop down your aperture indefinitely, because that affects your depth of field, and you can't crank your ISO up without introducing noise. This is precisely why Neutral Density (ND) filters are essential tools for any serious drone videographer.
ND filters are like sunglasses for your drone's camera lens. They reduce the overall amount of light entering the lens without altering the color. This allows you to maintain your desired shutter speed (and therefore your ideal shutter angle) even in bright conditions.
For example, if you're shooting at 30 fps and need a shutter speed of 1/60 sec, but the sun is glaringly bright, you'll need an ND filter to cut down that excess light. Without an ND filter, you'd be forced to use a much faster shutter speed, breaking the 180-degree rule and resulting in less natural motion blur.
Here's a quick look at common ND filter strengths and what they do:
| ND Filter Strength | Light Reduction (Stops) | Effect on Brightness | When to Use |
|---|---|---|---|
| ND8 | 3 stops | Reduces light by half | Moderately bright to bright sunny days |
| ND16 | 4 stops | Reduces light by a quarter | Bright sunny days |
| ND32 | 5 stops | Reduces light by an eighth | Very bright sunny days, shooting near water or snow |
| ND64+ | 6+ stops | Significant light reduction (darker) | Extremely bright conditions, or for very slow shutter speeds |
Using the right ND filter ensures you can keep your camera settings consistent and achieve that cinematic look, no matter how harsh the daylight might be. Many drone manufacturers offer integrated ND filter kits designed for their specific models.
Common Mistakes to Avoid with Shutter Settings
Even with the best intentions, it's easy to stumble when setting up your drone's camera. Getting shutter angle and shutter speed wrong can quickly turn what should be beautiful footage into something that's hard to watch. Being aware of these common pitfalls can save you a lot of frustration and reshoots.
Here are a few key mistakes to watch out for:
- Leaving Shutter on Auto: Auto shutter speed settings can fluctuate, especially with changing light. This leads to inconsistent motion blur, making your footage look jarring when you cut between shots. Always set it manually.
- Ignoring the 180-Degree Rule: For standard cinematic looks, sticking to the "double the frame rate" rule for shutter speed is usually best. Deviating without a clear creative purpose can result in footage that feels either too choppy or too blurry.
- Forgetting ND Filters: Trying to shoot in bright sunlight while maintaining a 180-degree shutter angle without ND filters is often impossible. This forces you to use a faster shutter speed, ruining your motion blur. Invest in a good set of ND filters.
- Incorrect Shutter Speed for Slow-Motion: When shooting at higher frame rates like 60 fps or 120 fps for slow-motion, remember to adjust your shutter speed accordingly (1/120 sec for 60 fps, 1/240 sec for 120 fps). If you don't, your slow-motion footage will look unnaturally smooth or even have ghosting effects.
- Not Checking Exposure: After setting your shutter speed, always check your exposure. If the image is too dark or too bright, you'll need to adjust your aperture or ISO, or add/remove an ND filter. The goal is a balanced exposure with the correct motion blur.
By understanding and avoiding these common errors, you'll be well on your way to capturing consistently professional-looking drone video.
Quick Guide: Choosing Your Shutter Angle Based on Scene
So, you've got the basics: the 180-degree rule is your go-to for natural motion blur, and ND filters are your best friend for controlling light. Now, how do you decide what shutter angle is truly "best" for a specific scene? It really comes down to the intended look and the type of motion you're capturing.
If you're aiming for that classic, smooth, cinematic feel that viewers are accustomed to, sticking to the 180-degree rule is almost always the right choice. This means setting your shutter speed to double your frame rate (e.g., 1/60 sec for 30 fps). This works wonderfully for establishing shots, sweeping landscape pans, or following subjects at a moderate pace.
However, if you need to freeze action or create a distinct, hyper-real look, you might choose a faster shutter speed (smaller shutter angle). Conversely, for a more ethereal or dreamy effect, a slightly slower shutter speed (larger shutter angle) can be used, but with caution. The key is to match your shutter angle to the feeling and purpose of the shot.
What to Consider for Different Scenarios:
Here's a simple breakdown to help you decide:
| Scene Type | Desired Look | Recommended Shutter Angle Guideline | Primary Settings to Adjust |
|---|---|---|---|
| Scenic Landscapes, Pans | Cinematic, Smooth | 180 degrees (1/60s @ 30fps) | Shutter Speed, ND Filters |
| Fast-Moving Subjects | Sharp, Clear Detail | < 180 degrees (e.g., 1/120s – 1/500s @ 30fps) | Shutter Speed, ND Filters |
| Action Shots (e.g., sports) | Freeze Motion | < 90 degrees (e.g., 1/250s+ @ 30fps) | Shutter Speed, ND Filters |
| Dreamy, Flowing Motion | Ethereal, Soft | > 180 degrees (e.g., 1/30s @ 30fps) | Shutter Speed, ND Filters |
Remember, these are guidelines. The best approach is always to experiment with your specific drone and camera settings in different lighting conditions to see what looks best for your project.
Frequently Asked Questions: Your Drone Video Shutter Angle Questions Answered
Why is the 180-degree rule so important for drone video?
The 180-degree rule is important because it creates a natural amount of motion blur that aligns with how the human eye perceives movement. This makes fast pans and drone movements look smooth and fluid, avoiding the jerky or unnatural stutter that can occur with incorrect shutter speeds. It’s the standard for cinematic video.
Can I use a shutter angle other than 180 degrees?
Yes, you absolutely can. Deviating from the 180-degree rule is a creative choice. A faster shutter speed (smaller angle) freezes motion for sharp detail, while a slower shutter speed (larger angle) increases motion blur for a dreamy effect.
However, these deviations should be intentional and understood for their visual impact.
What happens if my shutter speed is too fast for my frame rate?
If your shutter speed is too fast (smaller angle), you'll get very little motion blur. This can make your drone footage appear choppy, stuttery, or less immersive, especially during quick camera movements. It's great for freezing action but can look unnatural for general scenic footage.
How do ND filters help with shutter angle?
ND filters reduce the amount of light entering your camera without changing color. This is crucial because it allows you to maintain your desired shutter speed (and thus your 180-degree shutter angle) even in bright sunlight. Without ND filters, you'd be forced to use a faster shutter speed to avoid overexposure, breaking your desired motion blur.
Should I always use 24 fps for that cinematic look?
While 24 fps is the traditional cinematic frame rate and pairs perfectly with the 180-degree rule for that classic look, 30 fps is also widely used and looks very natural with the 180-degree rule (1/60 sec shutter speed). Higher frame rates like 60 fps are often used for smoother general footage or for slow-motion playback, and they also have their own 180-degree equivalent shutter speed (1/120 sec). The "best" frame rate depends on the overall style you're aiming for.