What Bitrate Should Drone Video Have?
When you're out flying your drone, the footage you capture can look incredible. But sometimes, it might appear a bit blocky, choppy, or just not as sharp as you hoped, especially when you go to edit it. A big part of why your drone video looks the way it does comes down to something called bitrate.
Getting this setting right is key to balancing quality with manageable file sizes.
So, what bitrate should drone video have? It really depends on where you plan to use the footage and what your drone can handle. For example, shooting in 4K at 60 frames per second (fps) requires a much higher bitrate than capturing 1080p at 30 fps, often demanding at least 100 Mbps for smooth playback.
We've dug into the specs and common practices to help you nail this down.
Quick Answer
Drone video bitrate should typically range from 24 Mbps to 120 Mbps. For 1080p at 30 fps, aim for 24-50 Mbps. For 4K at 30 fps, target 50-100 Mbps.
For 4K at 60 fps, use 100-120 Mbps or higher. Choosing a bitrate depends on your drone's capabilities, intended use, and desired file size.
Image source: Bing (Web (fair-use with source credit))
Why Bitrate Matters for Drone Footage
Think of bitrate like a highway for your video data. It’s the amount of data being processed and stored per second, usually measured in megabits per second (Mbps). A higher bitrate means more data is being packed into each second of your video.
This usually translates to better image quality, sharper details, smoother motion, and richer colors because there's more information for the camera to record.
Conversely, a lower bitrate means less data is being used. This results in smaller file sizes, which is great for saving storage space on your drone's SD card and on your computer. However, if the bitrate is too low for the resolution and frame rate you're shooting, you’ll start to see problems.
This can include pixelation (blocky images), motion artifacts (choppy movement), and a general lack of detail, making your footage look less professional. Manufacturer specifications for drones like the DJI Mavic 3 Pro, for instance, often list a maximum video bitrate they can record in different modes.
Choosing Your Video Codec: H.264 vs. H.265
Before you even think about bitrate, you need to understand video codecs. These are essentially compression tools that shrink your video file size. The two most common codecs you’ll find on drones are H.264 and H.265.
They handle data differently, impacting both quality and file size.
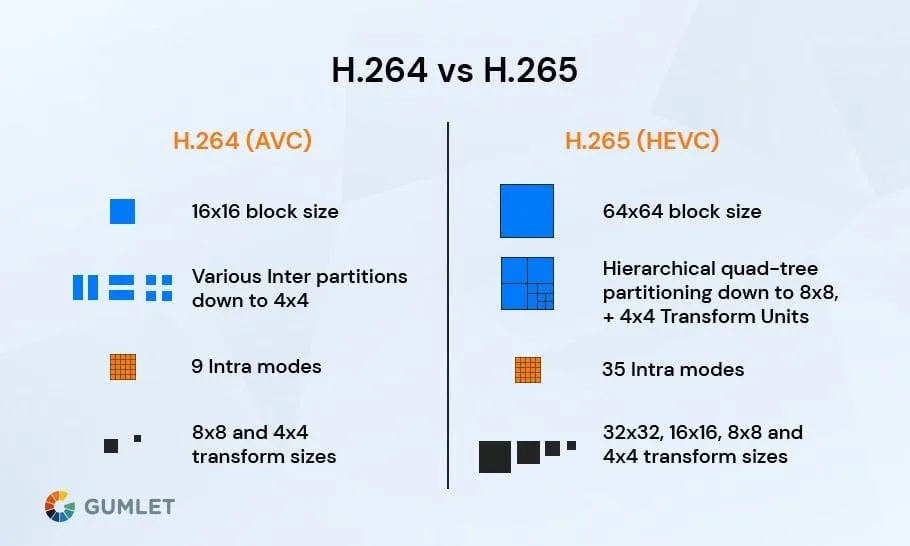
Image source: Bing (Web (fair-use with source credit))
H.264 (AVC): The Reliable Standard
H.264, also known as AVC (Advanced Video Coding), has been around for a while and is incredibly widely supported. Almost any device or editing software can handle H.264 files without issue. It offers a good balance between quality and file size, making it a solid choice for general use.
It’s efficient enough for most common resolutions and frame rates.
However, compared to its successor, H.264 is less efficient. This means to achieve a similar level of visual quality, H.264 files will be larger than those encoded with H.265. It's like comparing a standard highway to a superhighway; the superhighway can carry more traffic (data) with less congestion.
H.265 (HEVC): The Efficient Alternative
H.265, or HEVC (High Efficiency Video Coding), is the newer, more advanced codec. Its main selling point is its superior compression efficiency. Per industry standards and manufacturer documentation, H.265 can offer roughly the same video quality as H.264 but at about half the bitrate.
This means significantly smaller file sizes, which is a huge advantage when you're shooting long videos or in high resolutions like 4K.
The catch? H.265 files can be more demanding to process and edit. Older computers or less powerful editing software might struggle to play them back smoothly or edit them without lag.
Also, while support is growing rapidly, there can still be some compatibility issues with older devices or certain playback platforms. For many modern drones and editing workflows, H.265 is the preferred choice for its efficiency.
Finding the Right Bitrate: Resolution and Frame Rate Impact
The resolution and frame rate of your video are the biggest drivers of how much bitrate you'll need. You can't just pick a bitrate in a vacuum; it needs to match the visual information your camera is capturing.
4K vs. 1080p: What Resolution Are You Shooting?
Resolution refers to the number of pixels in each frame of your video. 4K UHD (Ultra High Definition) has a resolution of approximately 3840 pixels wide by 2160 pixels tall. This means it has about four times the number of pixels as 1080p Full HD (1920 pixels wide by 1080 pixels tall).
Because 4K has so much more detail packed into each frame, it requires a significantly higher bitrate to represent that information accurately. If you shoot in 4K but use a bitrate that’s too low, you'll lose much of the clarity and detail that makes 4K desirable, resulting in a video that looks worse than native 1080p footage. For instance, manufacturer specs often indicate that 4K footage needs at least 50 Mbps for H.264 and around 40 Mbps for H.265 to maintain good quality.
30fps vs. 60fps vs. 24fps: Motion Matters
Frame rate, measured in frames per second (fps), determines how smooth your video motion looks. Standard cinematic film is often shot at 24 fps, giving it a classic look. Most consumer video is shot at 30 fps, which provides a natural, lifelike motion.
Shooting at 60 fps or higher creates incredibly smooth footage, ideal for slow-motion effects or fast action.
Higher frame rates mean more individual images (frames) are captured and processed every second. To maintain image quality across all these frames, a higher bitrate is necessary. So, 4K at 60 fps will demand a much higher bitrate than 4K at 30 fps.
For example, moving from 30 fps to 60 fps for 4K video might require doubling your bitrate. Always check your drone's manual for its specific recording capabilities and recommended bitrates for each setting.
Bitrate Recommendations for Different Use Cases
Deciding on the right bitrate isn't just about technical specs; it’s about what you’re planning to do with your footage. Different applications have different demands.
For Social Media & Streaming
If your primary goal is to upload videos to platforms like YouTube, Instagram, or TikTok, you don't necessarily need the absolute highest bitrate your drone can offer. These platforms re-compress your video anyway, and often a moderate bitrate will suffice. For 1080p footage, a bitrate between 8 Mbps and 25 Mbps is generally good.
For 4K uploads, aim for 35-65 Mbps. Going much higher might not yield a noticeable improvement after platform compression and will just create unnecessarily large files. Always check the specific upload recommendations for each platform.
For Professional Projects & Archiving
If you're creating content for broadcast, feature films, high-end commercials, or simply archiving footage for future professional use, you'll want to capture at the highest quality your drone and storage can handle. This means using higher bitrates, often the maximum your drone allows for the chosen resolution and frame rate. For 4K at 60 fps using H.265, this could mean bitrates of 100-120 Mbps or even higher, depending on the drone model.
This ensures maximum detail and flexibility during the editing process and preserves the best possible quality for long-term use.
Balancing Quality and File Size: Bitrate Settings Explained
Now that we've touched on codecs and the impact of resolution and frame rate, let's get into the actual settings. Most modern drones offer options for Variable Bitrate (VBR) and Constant Bitrate (CBR). Understanding the difference can help you make a smarter choice for your footage.
It's all about how the drone manages its data flow.
Understanding Variable vs. Constant Bitrate
Variable Bitrate (VBR) allows the camera to use more data for complex scenes with lots of motion and detail, and less data for static shots. This is generally the most efficient method for saving storage space while maintaining good quality where it counts most. For example, a fast-moving aerial shot will get a higher bitrate allocation than a slow pan over a landscape.
Constant Bitrate (CBR), on the other hand, allocates the same amount of data per second, regardless of the scene's complexity. This can be useful if you know your editing software or a specific delivery platform prefers a consistent data stream. However, it's less efficient, meaning you might be using more storage than necessary for simple scenes or not having enough data for incredibly complex ones, potentially leading to artifacts.
As of 2026, VBR is the default and recommended setting for most drone applications.
Setting Your Target Bitrate in Mbps
When you go into your drone's camera settings, you'll often see options to set a target bitrate, usually in Mbps. This is where you directly influence the trade-off between file size and image quality. If your drone offers options like "High," "Medium," or "Low" bitrate, these typically correspond to ranges of Mbps.
For instance, "High" might be 100+ Mbps for 4K, while "Low" could be under 30 Mbps.
If your drone allows manual input, it's helpful to have a target in mind. For example, if you're shooting 4K at 30 fps in H.265 and want excellent quality for editing, you might set your target bitrate to around 100 Mbps. If you're concerned about storage and the footage is mainly for social media, you might aim for 50-60 Mbps.
Always confirm the maximum bitrate your specific drone model supports, as exceeding it won't improve quality and might cause recording issues.
Common Drone Video Bitrate Mistakes to Avoid
Even with the best intentions, it's easy to stumble when setting up your drone's video bitrate. Knowing these common pitfalls can save you a lot of frustration later on, especially when you're deep into editing and realize your footage isn't performing as expected. These mistakes often boil down to not understanding the interplay between settings.
One frequent error is setting the bitrate too low for the resolution and frame rate. For example, shooting 4K at 60 fps with a bitrate of only 30 Mbps is a recipe for disaster. You'll end up with severely pixelated footage and motion artifacts, regardless of how good your drone's sensor is.
It’s like trying to fill a large bucket with a tiny trickle of water, it just won't work efficiently.
Another common mistake is choosing the highest possible bitrate without considering your storage or editing capabilities. While maximum bitrate can offer the best raw quality, it also produces enormous file sizes. If your SD card is too small or your computer lacks the processing power for such demanding files, you’ll run into problems with dropped frames during recording or uneditable footage.
Always ensure your entire workflow can handle the data you're capturing.
When to Use Higher vs. Lower Bitrates
The decision between a higher or lower bitrate really hinges on your end goal for the video. Think about where the footage will be viewed and how much detail is truly necessary. This is a core element of the workflow decision process.
If your footage is destined for platforms like YouTube, Vimeo, or social media feeds, a lower to moderate bitrate is often sufficient. These platforms will compress your video again, so capturing at an ultra-high bitrate might be overkill. For 1080p, 25-50 Mbps is usually more than enough, and for 4K, 40-65 Mbps will likely look great after re-compression.
Using less data here saves significant storage space and makes uploading faster.
On the flip side, if you're creating professional cinematic pieces, documentaries, or footage intended for archival purposes, you'll want to lean towards higher bitrates. This preserves the maximum amount of detail, color information, and dynamic range. For these applications, using your drone's highest bitrate setting, especially in codecs like H.265, ensures you have the most flexibility for color grading, visual effects, and future-proofing your content.
Always check manufacturer specs for the highest supported bitrate for your drone model.
Frequently Asked Questions About Drone Video Bitrate
What is the best bitrate for DJI drones?
The "best" bitrate for DJI drones, or any drone for that matter, depends on the specific model and what you're shooting. For example, DJI's high-end models like the Mavic 3 series often support bitrates up to 200 Mbps or even higher in certain modes, especially with their professional codecs. For standard 4K at 30 fps using H.265, a target of around 100-120 Mbps is generally excellent.
For 1080p, 50 Mbps is typically more than adequate. Always refer to your drone's specific manual for its maximum supported bitrates and recommended settings for different resolutions and frame rates.
How does bitrate affect file size?
Bitrate directly impacts file size. The higher the bitrate, the more data is recorded per second, leading to larger files. Conversely, a lower bitrate means less data per second and smaller files.
For example, a video recorded at 100 Mbps will create files roughly twice as large as a video recorded at 50 Mbps under the same resolution and frame rate conditions. This is a critical consideration for storage management on your drone's SD card and your computer's hard drive.
Can I increase bitrate in post-production?
No, you cannot genuinely increase the bitrate of a video file in post-production without losing quality. You can re-encode a video with a higher bitrate, but this is an up-sampling process, not an actual increase in captured data. The original information simply isn't there if it wasn't recorded at a higher bitrate.
Attempting to do so will often result in artifacts and a softer image, as the software tries to invent detail that wasn't captured. It's always best to record at the desired bitrate from the start.