What Codec Is Best for Drone Footage?
Choosing the right codec for your drone footage is a decision that can significantly impact your workflow, storage needs, and the final quality of your video. When you're filming from the sky, you want to capture as much detail as possible without creating unmanageable file sizes or editing headaches. Understanding the trade-offs between different video compression formats is key to getting the most out of your drone.
In our research, we found that popular codecs like H.264 and H.265 are designed to balance quality with file size, while professional formats like ProRes offer superior editing performance but at the cost of much larger files. As of 2026, the standards for video compression continue to evolve, but these core options remain the most relevant for drone pilots.
Quick Answer
For drone footage, H.265 is often the best codec, balancing quality and file size. H.264 is a good, compatible alternative. For maximum editing flexibility, ProRes is superior but creates huge files.
RAW offers the most data but requires extensive post-processing.
Understanding Drone Video Codecs: Why It Matters
When you hit record on your drone, the camera's sensor captures a lot of raw visual information. A codec, short for coder-decoder, is essentially a piece of software or hardware that compresses this information into a smaller file for easier storage and transmission. Think of it like packing a suitcase: you want to fit everything you need without taking up too much space.
The choice of codec directly influences several critical aspects of your video production. It affects the visual quality of your footage, the amount of storage space your files will consume, and how smoothly you can edit them later. For drone pilots, especially those aiming for professional results, this decision isn't just technical; it's a fundamental part of your creative workflow.
Image source: Bing (Web (fair-use with source credit))
The Main Players: H.264 vs. H.265 vs. ProRes
When you're looking at your drone's camera settings, you'll typically encounter a few main codec options. Each has its own strengths and weaknesses, making one more suitable than another depending on your priorities.
H.264 (AVC): This is the workhorse of video compression, widely compatible across devices and software. It offers a good balance between quality and file size, making it a solid choice for general use. However, it's an older standard, and its compression efficiency isn't as high as newer codecs.
H.265 (HEVC): This is the successor to H.264, offering significantly better compression. Manufacturer specifications indicate that H.265 can reduce file sizes by up to 50% compared to H.264 while maintaining similar visual quality. This means more footage on your SD card and less space needed for storage. Compatibility is improving but can still be an issue with older editing software or devices.
ProRes: Developed by Apple, ProRes is a high-quality, visually lossless codec. It's favored by professional editors because it retains a lot of image information, making it incredibly flexible for color grading and other post-production work. The major downside is its massive file sizes, which can quickly eat up storage and require powerful editing hardware.
RAW: While not technically a codec, shooting in RAW format (often proprietary to the camera manufacturer) captures the absolute unprocessed sensor data. This offers the ultimate flexibility in post-production, allowing for extensive adjustments to exposure, color, and detail. However, RAW files are enormous, require specialized software to process, and significantly increase editing time and storage demands.
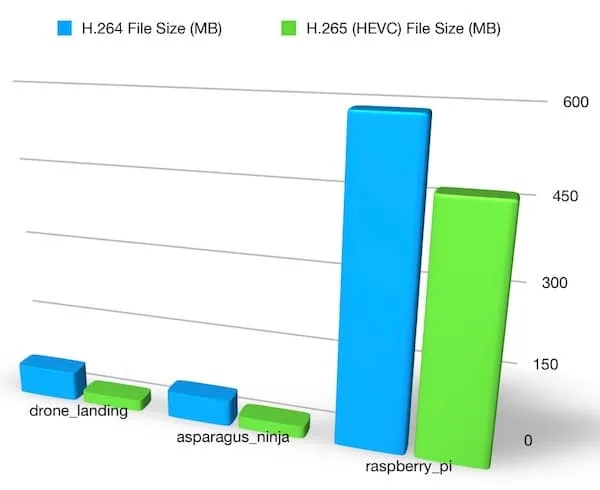
Image source: Bing (Web (fair-use with source credit))
What's Really Going On: Compression, Quality, and File Size
At its heart, choosing a codec is about managing the relationship between visual fidelity and data volume. Higher quality usually means a larger file, and smaller files often mean some compromise in quality.
Color Depth and Chroma Subsampling Explained
Two key technical aspects that codecs handle are color depth and chroma subsampling. Understanding these helps explain why some codecs retain more detail.
Color Depth: This refers to the number of bits used to represent the color of each pixel. Footage shot in 8-bit color has roughly 16.7 million colors, which is generally sufficient for most viewing. However, 10-bit color, which uses 1.07 billion colors, captures far more subtle gradations. This is crucial for professional color grading, as it allows for more extreme adjustments without introducing banding or color artifacts. Many modern drones offer 10-bit recording, especially with H.265.
Chroma Subsampling: This is a compression technique that exploits the fact that the human eye is more sensitive to brightness (luma) than to color (chroma). Chroma subsampling reduces the amount of color information stored relative to brightness information. Common formats are 4:4:4 (no subsampling, full color info), 4:2:2 (half the color info horizontally), and 4:2:0 (half color info horizontally and vertically). While 4:2:0 is most common for consumer formats like H.264 and H.265, professional codecs like ProRes often use 4:2:2 or even 4:4:4 to preserve maximum color detail for editing.
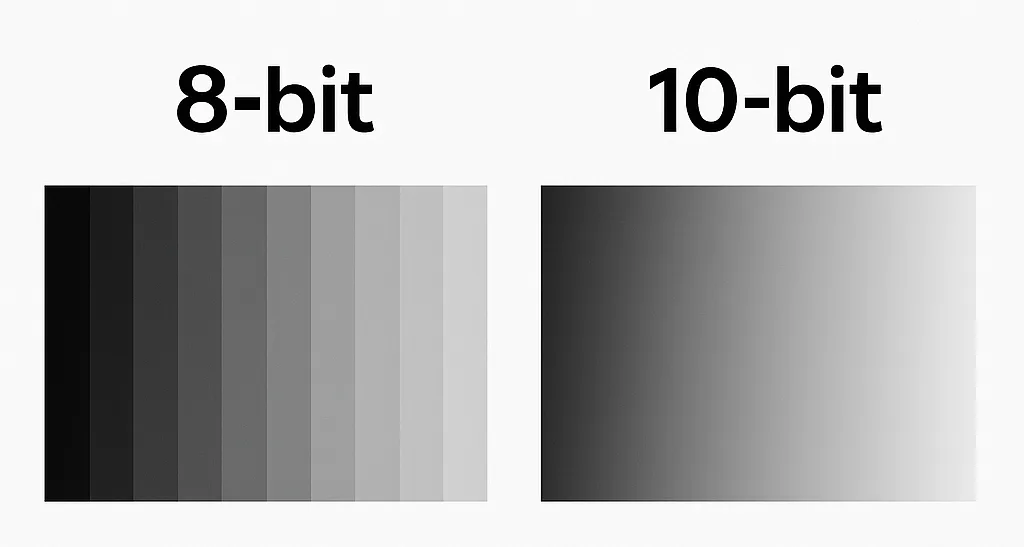
Image source: Bing (Web (fair-use with source credit))
Bitrate: The Speed Limit for Your Video Data
Bitrate is the amount of data used per second to encode your video. It's often measured in megabits per second (Mbps). A higher bitrate generally means more data is being used, which translates to better quality and larger file sizes.
Variable Bitrate (VBR): VBR allows the encoder to dynamically adjust the bitrate based on the complexity of the scene. Busy scenes with lots of motion and detail might get a higher bitrate, while static scenes get a lower one. This is efficient for managing file sizes while trying to preserve quality where it counts. H.264 and H.265 commonly use VBR.
Constant Bitrate (CBR): CBR assigns a fixed bitrate to the video regardless of the scene's complexity. This can be useful for streaming or in situations where consistent bandwidth is required. However, it can be less efficient for storage, as you might be allocating more data than necessary to simple scenes.
Drone manufacturers typically specify the maximum bitrate their cameras can record for each codec and resolution. For example, a 4K H.265 recording might be set at 100 Mbps, while the same footage in H.264 might require 150 Mbps.
Putting It to the Test: Which Codec for Your Needs?
When you're selecting a codec on your drone, it's not a one-size-fits-all situation. Your choice should align with your editing capabilities, storage capacity, and what you plan to do with the footage.
For Maximum Editing Flexibility (and Bigger Files)
If you plan on doing extensive color grading, visual effects, or need footage that can withstand a lot of manipulation without degrading, you'll want the most robust codec.
- ProRes: This codec is the go-to for many professional video editors. It offers near-lossless compression, meaning it retains a vast amount of image information from the sensor. This gives you immense latitude in post-production to adjust exposure, white balance, and colors without introducing artifacts like banding or crushing details in the shadows or highlights.
- RAW: For ultimate control, shooting in RAW is the peak. However, it comes with significant drawbacks. RAW files are enormous, demanding high-capacity, fast storage solutions and powerful computers to edit smoothly. They also require specialized software to debayer and process.
Who is this for? Professional filmmakers, commercial video producers, and editors who prioritize image quality and post-production flexibility above all else. Be prepared for substantial storage costs and demanding hardware requirements.
For Balancing Quality and File Size
This is where most drone pilots, from enthusiasts to semi-professionals, will find their sweet spot. You want good quality for your videos without your hard drives filling up instantly.
- H.265 (HEVC): This codec is often the best compromise. As mentioned, it offers excellent compression, meaning you can record longer clips and more footage on your SD cards. Manufacturer specifications confirm that H.265 can achieve file sizes around 50% smaller than H.264 for similar perceived quality. It also typically supports 10-bit color, giving you better flexibility for color grading than standard H.264.
- H.264 (AVC): While older, H.264 remains a reliable choice. It's universally compatible with almost all editing software and playback devices. If you're worried about editing performance on a less powerful computer or need maximum compatibility, H.264 is a safe bet. Its compression is less efficient than H.265, so expect larger files and potentially less room for aggressive color correction, especially if shooting in 8-bit.
Who is this for? Content creators, social media influencers, hobbyists, and anyone who needs good quality footage for online sharing or general viewing without needing extreme post-production flexibility or breaking the bank on storage.
For Storage Efficiency (and Potential Editing Compromises)
If your primary concern is maximizing the amount of footage you can capture on a single SD card or minimizing your long-term storage costs, you'll lean towards the most efficient codecs.
- H.265 (HEVC): This is the clear winner here. Its advanced compression algorithms mean you get more video data packed into fewer megabytes per second. This translates directly to more flight time and more footage recorded.
- Motion JPEG (MJPEG): Some drones, particularly older or lower-end models, might offer MJPEG. This codec captures each frame as a separate JPEG image, resulting in very large files but excellent per-frame quality and easy editing. It's generally not recommended for general drone videography due to its inefficiency, but it's worth mentioning as an option that prioritizes individual frame data.
Who is this for? Pilots who fly for extended periods, need to capture vast amounts of footage (e.g., for surveying or mapping), or have limited storage capacity and are willing to accept slightly less editing flexibility or potentially longer export times. You’ll need to ensure your editing software can handle H.265 smoothly.
Real-World Drone Footage Scenarios
The best codec for you really depends on what you're doing with your drone footage. Let's break down a few common situations.
Shooting for Social Media
If your primary goal is to upload videos to platforms like YouTube, Instagram, or TikTok, you need a balance of quality and manageable file sizes. Highly compressed files can make uploading quicker, and most social media platforms re-compress your footage anyway.
- H.264 (AVC): This is often the safest bet. It's universally compatible, so you won't run into issues importing your footage into editing software or when uploading. While H.265 offers better compression, the final output quality on social media might not show a significant difference, and the compatibility headaches of H.265 aren't usually worth it for this use case.
- H.265 (HEVC): If you have a robust editing setup and are comfortable working with H.265, it can be a good option. The smaller file sizes mean more footage on your SD card during long shoots. Just be sure your editing software supports it natively or through plugins, and that your computer can handle the decoding.
Recommendation: For most social media creators, H.264 is the most straightforward choice. If you're shooting in 4K and want to save space, H.265 is a viable alternative, provided your editing workflow supports it.
Filming for Professional Projects
When your drone footage is part of a larger professional production, whether it's a documentary, a commercial, or a feature film, the demands on your codec change dramatically. Quality and editing flexibility become paramount.
- ProRes: This codec is a strong contender here. Its near-lossless nature means you retain significant detail, making it ideal for color grading and visual effects. When shooting for a professional project, you can't afford to have your footage break down during extensive post-production.
- RAW: For ultimate control and the highest possible image quality, shooting in RAW format is often specified by directors of photography or post-production supervisors. This format captures the most data from the sensor, offering unparalleled flexibility in grading and manipulation. However, the sheer size of RAW files means you'll need substantial storage and high-performance editing hardware.
Recommendation: For professional work where post-production is intensive, ProRes or RAW are typically the standard. The exact choice often depends on the project's specific requirements, the director of photography's preference, and the post-production pipeline.
Editing on a Budget System
If you're working with an older computer or a less powerful laptop, editing heavily compressed codecs like H.264 can lead to choppy playback, slow rendering, and general frustration.
- ProRes (especially ProRes LT or Proxy): While full ProRes can be demanding, Apple developed lighter versions like ProRes LT and ProRes Proxy specifically for more accessible editing. These codecs offer much better editing performance than H.264 or H.265, even on less powerful systems. You'll need to convert your drone's native footage to ProRes using software like DaVinci Resolve or Adobe Media Encoder, which adds an extra step but pays off in a smoother workflow.
- H.264 (AVC) with Optimized Settings: If converting to ProRes isn't an option, try editing H.264 footage directly. Some editing software allows you to create proxy files, which are lower-resolution versions of your footage used during editing. This significantly speeds up playback without affecting the final export quality. You can also try to shoot at a lower bitrate if available, though this will impact image quality.
Recommendation: For budget editing systems, transcending to ProRes Proxy or LT is the most effective strategy for smooth playback and editing. If that’s not possible, leverage proxy workflows within your editing software when working with H.264. Avoid H.265 if your system struggles with it.
Common Mistakes When Choosing a Drone Codec
Even with the best intentions, pilots often make a few recurring errors that can lead to footage problems down the line. Avoiding these common pitfalls will save you a lot of frustration.
- Ignoring Editing Software Compatibility: A frequent mistake is choosing a codec like H.265 or RAW without verifying if your editing software can handle it smoothly. Many older or less powerful editing programs struggle with these formats, leading to choppy playback, slow rendering, and crashes. Always check your software's capabilities before committing to a codec.
- Over-compressing for Long Flights: While storage efficiency is good, shooting at the lowest possible bitrate can severely degrade image quality. Aggressive compression introduces artifacts, reduces detail, and makes color grading nearly impossible. It's a false economy if the resulting footage is unusable for your intended purpose.
- Not Considering Future Needs: Sometimes, pilots choose a codec based solely on immediate storage needs without thinking about how they might want to use the footage later. Footage shot in a highly compressed format might not hold up well if you later decide to make a high-quality print or a professional broadcast.
Frequently Asked Questions About Drone Video Codecs
What's the difference between a codec and a container?
A codec (coder-decoder) is the algorithm used to compress and decompress video data, while a container (like .mp4 or .mov) is the file format that holds the compressed video and audio streams. Think of the codec as the packing method and the container as the box it's put into.
Can I change the codec after shooting?
Yes, you can convert footage from one codec to another using video editing software or dedicated transcoding tools. However, converting from a more compressed format (like H.264) to a less compressed one (like ProRes) won't restore lost quality. It's always best to shoot in the highest quality codec your workflow can handle.
Is 10-bit always better than 8-bit for drone footage?
10-bit color depth offers significantly more color information, providing much greater flexibility for color grading and reducing banding in smooth gradients. If you plan on doing any color correction, 10-bit is highly recommended. For simple uploads to social media where the platform will re-compress anyway, 8-bit might be sufficient.