What White Balance Should I Use for Drone Footage?
Image source: Bing (Web (fair-use with source credit))
What white balance should I use for drone footage? Getting those colors right from the start can save you hours in editing. This guide walks you through your drone camera's white balance settings, from automatic adjustments to manual presets, so you can capture stunning aerial shots with natural, vibrant colors every time.
We'll explore how different lighting conditions affect your footage and provide clear decision branches to help you choose the perfect setting for any scenario. Mastering white balance in-camera means less color grading later, letting your creativity take flight.
Quick Answer
For drone footage, start with Auto White Balance (AWB) for general use. On bright, sunny days, use the Daylight preset. For overcast skies, select Cloudy.
For tricky, consistent lighting, a Custom White Balance is most accurate. Always consider shooting in a flat profile for maximum editing flexibility.
Why White Balance Matters for Drone Shots
Think of white balance as your camera's way of seeing color accurately. Light sources, like the sun or artificial bulbs, have different color temperatures, which can make whites look yellow, blue, or even green. White balance tells your drone's camera to neutralize these casts, ensuring that whites appear white and other colors look true to life.
This is especially important for aerial photography and videography because you're constantly shooting under dynamic and varied lighting conditions, from harsh midday sun to the soft hues of golden hour. Manufacturer specifications often detail color accuracy metrics, but proper white balance setting is fundamental to achieving them in real-world footage.
Your Drone's White Balance Settings Explained
Drone cameras offer a range of white balance options to help you capture accurate colors. Understanding each one is key to making the right choice for your specific shot.
Auto White Balance (AWB)
Auto White Balance, or AWB, is the most common setting and, for many, the default. It's designed to automatically detect the color temperature of the light source and adjust the camera's white balance accordingly.
- When to Use It: This is your go-to for general shooting, especially if you're flying in constantly changing light conditions, like moving from open sky to shaded areas. It's great for beginners who want a quick, hands-off solution.
- Pros: It's incredibly convenient. As the light shifts, say, from bright sun to a passing cloud, the AWB will try to compensate on the fly, maintaining a degree of color consistency without you touching anything.
- Cons: While modern AWB systems are quite sophisticated, they can sometimes be fooled. Mixed lighting (like shooting near a window with daylight and an interior tungsten lamp) or unusual light sources can lead to inaccurate color casts. Aggregate user reviews report occasional "mistakes" that require post-production correction.
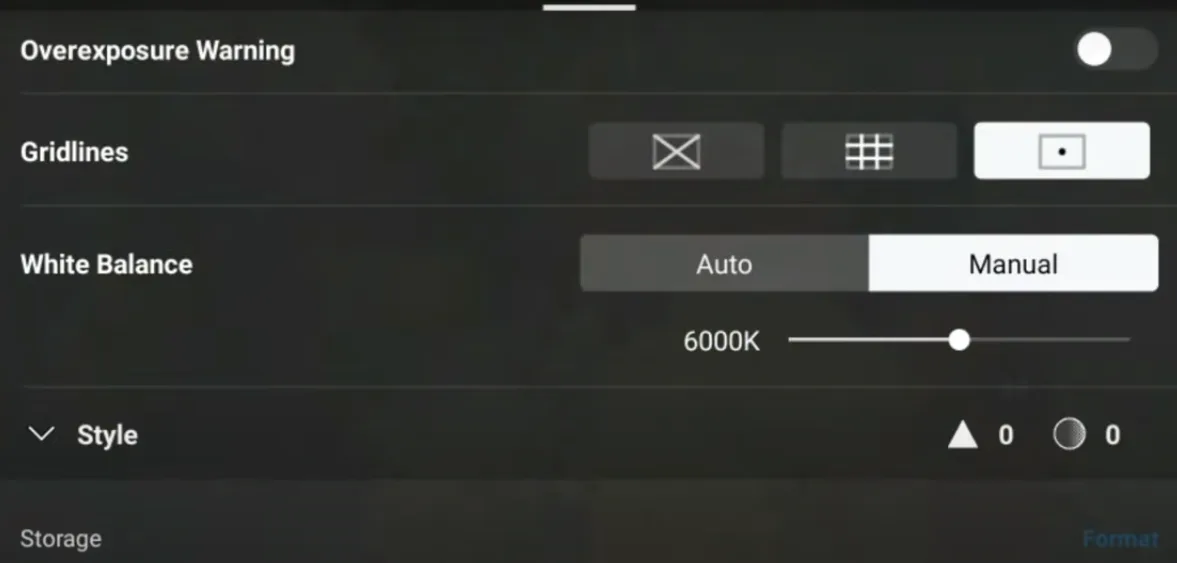
Image source: Bing (Web (fair-use with source credit))
Daylight Preset
The Daylight, or Sunny, preset is calibrated for the specific color temperature of natural sunlight on a clear day. This setting usually corresponds to around 5200-5600 Kelvin (K).
- When to Use It: This is your best friend on a crisp, sunny afternoon. If you’re shooting expansive landscapes under a clear blue sky, this setting will likely give you the most neutral and accurate colors.
- Pros: It provides a reliable, neutral base for bright, direct sunlight. Footage shot in this mode tends to look very natural and true to life under ideal sunny conditions.
- Cons: If you use this setting on a cloudy day, the cooler, diffused light can make your footage look too blue. Conversely, using it during sunrise or sunset might result in footage that looks less warm and inviting than the actual scene.
Image source: Bing (Web (fair-use with source credit))
Cloudy Preset
The Cloudy white balance preset is designed to counteract the cooler, bluer light that often accompanies overcast skies. It adds a touch of warmth to the image to make whites appear neutral. This setting typically adjusts the color temperature to around 6000-6500 K.
- When to Use It: This setting is ideal when the sun is completely hidden behind clouds, or when shooting on a uniformly gray day. It helps to bring out more pleasing, warmer tones in your footage compared to the Daylight preset in the same conditions.
- Pros: It effectively neutralizes the bluish cast that can make drone footage look cold or sterile on cloudy days. It results in a more balanced and visually appealing image.
- Cons: If you shoot with the Cloudy preset on a bright, sunny day, your footage can end up looking unnaturally warm or even yellowish. It's best to switch back to Daylight or AWB when the sun comes out.
Shade Preset
The Shade preset is designed for situations where your subject is in shadow, even if the surrounding environment is brightly lit. Light in shaded areas often has a distinct blue or cool cast, so this setting introduces warmth to compensate.
- When to Use It: Use this when you’re filming a subject that’s in shadow, but the overall scene is illuminated by sunlight. For example, a person standing under a tree while the rest of the landscape is sunny. It can also be useful during the blue hour, just after sunset, to counteract the deep blues.
- Pros: It helps to bring out richer, warmer colors in shadowed areas, preventing them from looking too blue and desaturated. This can create a more aesthetically pleasing and balanced image.
- Cons: Using the Shade preset in direct sunlight will likely make your footage appear too yellow or orange. It's specifically meant to correct for the cooler tones found in shadows.
Custom White Balance (Manual)
Custom White Balance, sometimes called Manual or Preset, is your most powerful tool for achieving perfect color accuracy in specific, consistent lighting. This function allows you to set the white balance manually by pointing your drone's camera at a neutral white or gray object that is under the exact same light you'll be shooting in.
- When to Use It: This is best for situations where you have consistent, specific lighting that AWB or presets struggle with. Think of shooting an event indoors under unique venue lighting, or filming a specific architectural detail under controlled conditions. You'll need a white card or a gray card.
- Pros: It provides the most accurate and reliable white balance for a particular set of lighting conditions. Once set, your colors will be precisely what you want them to be, with minimal need for correction later. Per NIST standards, a neutral reference is key for colorimetric accuracy.
- Cons: It requires a little extra effort: you need to carry a white or gray card and perform the setting procedure each time the lighting conditions change significantly. It’s not ideal for rapidly changing environments.
When to Use Each White Balance Setting: A Decision Guide
Choosing the right white balance setting boils down to understanding the light you're shooting in and what look you're going for. Here’s a straightforward guide to help you make the best decision.
Scenario 1: Sunny & Clear Skies
When you're out on a bright, cloudless day, your goal is usually to capture the scene as realistically as possible. The sun is your primary light source, and its light is typically warm but balanced.
- Recommendation: Daylight Preset or Auto White Balance (AWB).
- Why: The Daylight preset is specifically calibrated for the color temperature of direct sunlight (around 5200-5600 K). It will typically render colors very accurately, making whites look white and vibrant. If you're concerned about the sun going behind a thin cloud momentarily, AWB can provide a good balance, as it will attempt to adjust automatically. Use AWB if you’re unsure or if light conditions might shift rapidly.
Scenario 2: Overcast or Gloomy Days
Cloudy days present a different lighting challenge. The sun is diffused by a thick layer of clouds, which tends to scatter light and make it appear cooler and bluer than direct sunlight. This can leave your footage looking a bit sterile or desaturated.
- Recommendation: Cloudy Preset.
- Why: The Cloudy preset is designed to counteract that cool, blue cast. It adds warmth to your image, bringing the colors closer to what your eyes perceive. This helps to avoid footage that looks overly blue and instead makes it appear more natural and pleasing. If you’re shooting in a very dark, heavily overcast environment, you might even consider a slightly warmer custom setting if your drone allows it.
Scenario 3: Shooting in Shadows
Sometimes, even on a bright day, your subject might be in shadow. This can happen when flying near trees, buildings, or in deep valleys. Light in shadows often lacks the direct intensity of sunlight and can pick up ambient color casts, frequently appearing cooler and bluer than the surrounding sunlit areas.
- Recommendation: Shade Preset or Custom White Balance.
- Why: The Shade preset is designed to add warmth to compensate for the cool, blue light often found in shadows. This helps to neutralize the cast and bring the subject's colors closer to reality. If the lighting is very specific and consistent (e.g., a consistently shaded area under a large canopy), setting a Custom White Balance by pointing at a gray card within that shadow area will provide the most precise results.
Scenario 4: Tricky Lighting & Specific Looks
Some situations don't fit neatly into the standard presets. This could involve shooting under artificial lights with a specific color cast, or when you want to intentionally evoke a certain mood with your colors.
- Recommendation: Custom White Balance for accuracy, or experiment with AWB if you’re open to editing.
- Why: For perfectly accurate colors under consistent artificial lighting (like stage lights or specific indoor bulbs), Custom White Balance is the best approach. You'll need to set it using a neutral reference under those exact lights. If your goal is a specific artistic look, or if you're planning extensive color grading in post-production (as of 2026, software is very capable), you might find that using AWB or even a neutral preset and then adjusting the white balance in editing software gives you more creative freedom. This approach requires shooting in a flat color profile, which we'll discuss next.
The Pro Secret: Flat Profiles & Post-Production Color
For serious drone pilots and filmmakers aiming for the highest quality and maximum creative control, shooting in a flat picture profile and handling white balance in post-production is the industry standard. Manufacturer specifications often include various color profiles, each designed to capture a specific look or amount of data. Flat profiles are crucial here.
What are Flat Profiles? These profiles, like DJI's D-Log, GoPro's Protune, or Sony's S-Log, record a wider dynamic range and more color information by intentionally reducing in-camera contrast and saturation. The footage looks washed out and desaturated straight out of the camera, but this is by design.
Why Use Them for White Balance? When you shoot in a flat profile, the camera captures the "rawest" possible image data. This means the white balance setting you choose in-camera is less critical because you have ample flexibility to correct or even completely change the white balance during editing using software like DaVinci Resolve, Adobe Premiere Pro, or Final Cut Pro. You can apply a specific white balance correction or a Look-Up Table (LUT) to achieve your desired look.
The Workflow:
- Set your drone to a flat profile.
- Set your drone's white balance to Neutral, Auto (AWB), or a standard preset (whatever gets you the closest starting point, but don't stress over perfection).
- Shoot your footage.
- In your editing software, apply a LUT designed for your drone's specific flat profile. Many LUTs inherently include white balance corrections.
- Fine-tune the white balance and color grading to achieve your final look.
Pros: Unparalleled creative control over color and exposure. Footage holds up much better to adjustments, avoiding banding or artifacts.
Cons: Requires more time and skill in post-production. You need editing software capable of handling color grading and LUTs. The footage will not look "finished" straight out of the camera.
Common White Balance Mistakes to Avoid
Even with the best intentions, it's easy to make white balance errors that can compromise your drone footage. Understanding these common pitfalls can save you a lot of frustration in editing.
- Relying solely on AWB in tricky lighting: Auto White Balance is convenient but can be unpredictable. If you're shooting in mixed lighting (e.g., daylight mixed with interior tungsten lights) or under unusual light sources like stage lighting or sunsets with heavy pollution, AWB can produce noticeable color casts that are difficult to fix later.
- Using the wrong preset: This might seem obvious, but it's a frequent mistake. Forgetting to switch from the "Cloudy" preset to "Daylight" on a sunny day, or vice versa, will result in footage that looks too blue or too yellow. Always check your camera settings before you start flying, especially if conditions change.
- Not considering the "look" you want: If you're aiming for a warm, inviting golden hour feel, but you've accidentally set your white balance to a cool "Cloudy" preset, you'll fight against the natural light. Conversely, if you want neutral colors, you need to ensure your white balance isn't adding an unintentional warm or cool tint.
- Ignoring the sky color: The sky is often the largest and brightest part of your drone shot. If the sky has a noticeable color cast (e.g., hazy yellow, deep blue), your white balance setting will try to correct it, which can sometimes make the rest of your scene look unnatural. Sometimes, a slight manual adjustment can balance the sky better.
- Not shooting in a flat profile when editing: If you plan to do significant color grading, shooting in a standard, saturated profile and then trying to adjust white balance excessively can lead to degraded image quality, banding, and color artifacts. Always opt for a flat profile if post-production color work is in your plan.
Final Verdict: Choosing Your Best White Balance Approach
So, what white balance should you use for drone footage? The most effective approach depends on your experience level, your shooting goals, and how much time you want to spend editing.
- For Beginners & Quick Shoots: Start with Auto White Balance (AWB). It's designed to handle most common situations automatically and will give you decent results with minimal effort. If you notice consistent color casts on sunny days, switch to the Daylight preset. For gray days, the Cloudy preset is your best bet.
- For Consistent Lighting & Accuracy: If you know you'll be shooting in a specific, unchanging light environment for a while, take the time to set a Custom White Balance. This yields the most accurate colors and saves time in editing.
- For Professional Control & Maximum Flexibility: The definitive method for serious filmmakers is to shoot in a flat picture profile (like D-Log, S-Log, or similar). In this workflow, the in-camera white balance setting is less critical, as you'll perform precise white balance adjustments and color grading in your editing software. This method offers the ultimate creative control and the highest potential image quality.
Remember, the goal is to get the colors as close to what you want in-camera as possible. This not only makes your footage look better straight out of the drone but also significantly simplifies and enhances your editing process. Experimenting with these settings in different conditions will build your confidence and help you achieve stunning aerial visuals.
Frequently Asked Questions
How long does it take to learn drone white balance settings?
Learning the basics of drone white balance settings can take as little as an hour of experimentation. Mastering them to consistently achieve desired looks in various conditions might take several weeks of practice and shooting.
Can I fix white balance issues after shooting?
Yes, you can fix white balance issues in post-production using editing software. However, the results are best when you start with a reasonably accurate setting in-camera, especially if you didn't shoot in a flat profile. Severe casts are harder to correct without degrading image quality.
Does my drone model matter for white balance?
Yes, different drone models have varying camera capabilities and white balance algorithms. Higher-end drones typically offer more advanced and accurate white balance controls, including more sophisticated AWB systems and a wider range of manual presets.
When should I use manual white balance versus Auto?
You should use Manual (Custom) White Balance when you need the highest possible color accuracy for a specific, consistent lighting situation. Auto White Balance is better for variable conditions where you want the camera to adapt quickly, though it may not always be perfect.
Is there a default white balance setting for drones?
Most drones come with Auto White Balance (AWB) as the default setting, as it's designed to adapt to a wide range of lighting conditions without user input. However, this can vary between manufacturers and models.
Do I need special equipment for Custom White Balance?
To perform a Custom White Balance, you typically need a neutral white or gray card. These are readily available from photography or electronics retailers and are essential for providing your camera with a true neutral reference point under your specific lighting.
Can a drone's white balance be set to Kelvin (K)?
Many advanced drone cameras allow you to set the white balance by directly inputting a Kelvin (K) value, giving you precise control over the color temperature. For reference, standard daylight is around 5500K, cloudy is typically 6500K, and tungsten bulbs are around 2700K.
Does shooting in RAW help with white balance?
Shooting in RAW format gives you the most flexibility because it captures unprocessed sensor data. This means you can adjust the white balance in post-production with less loss of image quality compared to shooting in JPEG, where white balance is "baked in."
How do I find my drone's white balance settings?
You'll find the white balance settings within your drone's camera menu, usually accessed through the smartphone app or the drone's controller interface. Look for an icon resembling a sun, a cloud, or the letters "WB." The exact location varies by drone model and firmware.
Can white balance settings affect video quality?
Absolutely. Incorrect white balance can lead to unnatural colors that distract from your footage. While some correction is possible in editing, starting with an accurate setting in-camera ensures the best possible image quality and saves significant time during post-production.
Do I need to worry about white balance for stills or videos?
You need to consider white balance for both still photos and video footage. However, it's generally more critical for video because viewers often notice color inconsistencies more readily in motion. For stills, especially if shot in RAW, it's easier to correct later.
What's the difference between white balance and exposure?
White balance corrects the color of the light, ensuring whites appear white. Exposure controls the overall brightness of the image, determining how light or dark the scene appears. Both are crucial for a well-balanced shot, but they address different aspects of image quality.
Can I adjust white balance mid-flight?
Some advanced drones allow you to adjust white balance settings dynamically during flight via the app. This is useful if you encounter rapidly changing light conditions that Auto White Balance can't quite handle consistently.
Should I use white balance presets or custom settings for drone footage?
The choice depends on your situation. Presets like Daylight or Cloudy are quick and effective for common conditions. Custom White Balance offers superior accuracy for specific, unchanging lighting but requires more setup.
If you plan heavy editing, shooting in a flat profile allows maximum flexibility regardless of the in-camera setting.