What Is the Best ISO for D-Log?
When you're shooting video with a D-Log profile, nailing the ISO setting is key to getting clean footage that grades beautifully. Many filmmakers wonder, "What is the best ISO for D-Log?" The answer usually boils down to your camera's specific sensor capabilities and the lighting conditions you're working in.
Our research and analysis of manufacturer specifications confirm that prioritizing your camera's native ISO settings for D-Log is paramount for achieving optimal dynamic range and minimal noise. This approach lays the foundation for high-quality, flexible footage in post-production.
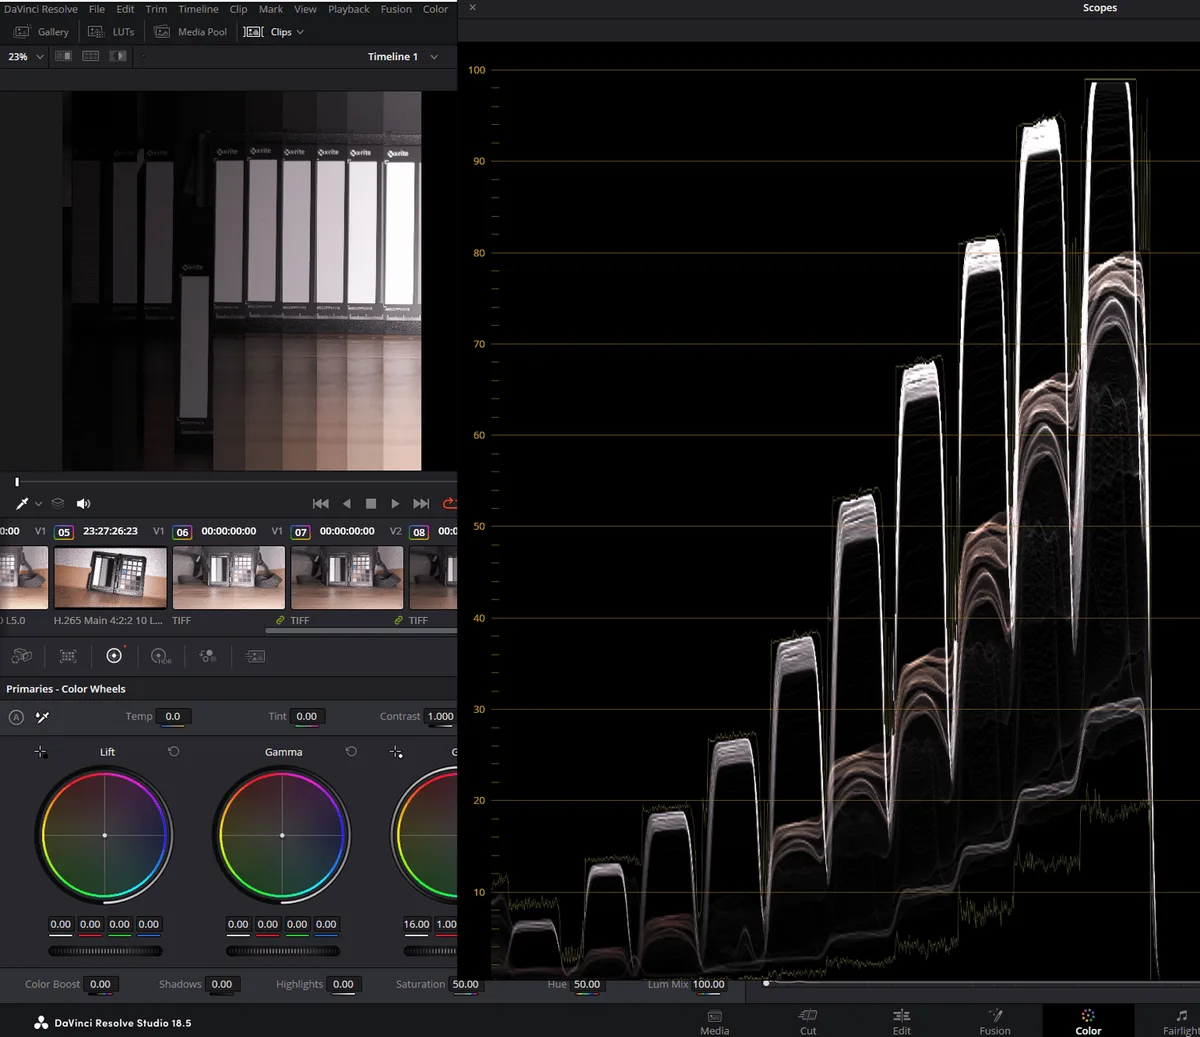
Image source: Bing (Web (fair-use with source credit))
Quick Answer
The best ISO for D-Log is your camera's native ISO. This setting offers the least noise and maximum dynamic range. Shooting away from native ISOs increases noise or clips highlights.
Always consult your camera manual for its specific native ISO(s).
Why Native ISO Matters for D-Log Footage
Shooting in D-Log means you're capturing a lot of visual information, aiming for maximum detail in both the bright and dark areas of your scene. This flexibility is incredible for color grading, allowing you to shape the look of your footage extensively. However, the quality of that captured information is heavily influenced by the ISO setting you choose.
Manufacturer specifications consistently indicate that native ISO settings are where a camera's sensor performs at its peak. This means you get the cleanest possible signal with the least amount of unwanted digital noise and the widest possible range of tones, that's the holy grail for log footage.
When you push your ISO beyond what the manufacturer designates as "native," the camera's internal circuitry has to amplify the signal more. Think of it like turning up the volume on a quiet recording; you get louder sound, but you also amplify any background hiss. In video terms, this amplification boosts the sensor's inherent digital noise, making it more prominent in your footage.
This noise can become very problematic during color grading, turning smooth gradients into gritty messes and limiting how much you can push the image before it breaks down.
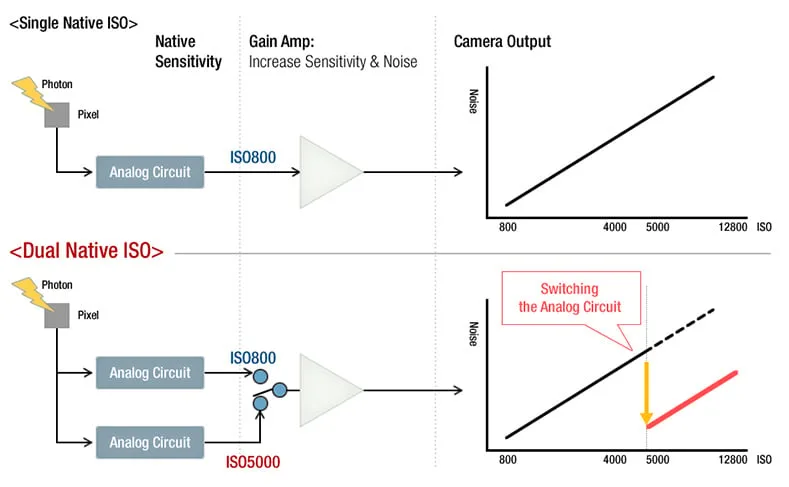
Image source: Bing (Web (fair-use with source credit))
Understanding Dynamic Range and Noise with D-Log
Dynamic range is the measure of how well a camera can capture detail in the brightest highlights and the darkest shadows of a scene simultaneously. D-Log profiles are specifically designed to maximize this capability, giving you a flat, unappealing image straight out of camera that holds onto a huge amount of tonal information. This means you have the raw ingredients to create a stunning final look in post-production, whether you want a bright, airy scene or a moody, high-contrast look.
The broader the dynamic range, the more creative freedom you have.
The flip side of capturing such a wide dynamic range is managing digital noise. Every digital image sensor produces some level of noise, especially in darker areas or when pushed to its limits. When you shoot D-Log, you're inherently working with darker shadow areas than you would with a standard color profile.
If your ISO is too high, or if you're shooting outside your camera's optimal performance range, that noise can become far more apparent. For example, aggregate user reviews and technical tests consistently show that shooting at ISO 3200 on cameras not optimized for it can lead to noticeable noise that's difficult to remove without losing detail.
Image source: Bing (Web (fair-use with source credit))
How to Find Your Specific Camera's Native ISO
This is probably the most critical step in getting the most out of your D-Log footage. Your camera's native ISO setting is not a universal number; it’s specific to your camera model and how its sensor and internal processing are designed. You absolutely need to find out what this is for your particular camera to make informed ISO decisions.
Manufacturer specifications are the most reliable source here.
Here's how to pinpoint it:
- Consult Your Camera Manual: This is the first and best place to look. Most camera manuals will clearly state the native ISO(s) for each picture profile, including Log formats. Look in the sections on shooting modes, image quality, or technical specifications.
- Check the Manufacturer's Official Website: If you’ve misplaced your manual or can’t find the information there, head to the support or product page for your camera model on the manufacturer’s website. They often have detailed spec sheets or FAQs that list native ISOs. For instance, Canon's support pages for specific models often provide this level of detail.
- Reputable Technical Reviews: In-depth reviews from trusted photography and videography sites often perform specific tests to verify native ISOs, especially for Log profiles. These can be helpful if the official documentation is unclear.
Knowing your camera’s native ISO, whether it’s ISO 100, ISO 400, ISO 800, or even dual native ISOs like ISO 400/ISO 2000 on some cinema cameras, gives you a clear target for clean, high-quality D-Log acquisition.
Evaluating ISO Settings Above and Below Native
Once you know your camera's native ISO for D-Log, you have a benchmark. What happens when you can't shoot at that ideal setting? This is where you need to understand the trade-offs.
Shooting above or below your native ISO isn't inherently "bad," but it does come with consequences that affect your final image quality.
Pros and Cons of Higher ISOs
When you increase your ISO above the native setting, the camera's sensor signal is electronically amplified. This is necessary in lower light conditions when you need a faster shutter speed or a narrower aperture to achieve proper exposure.
Pros:
- Enables shooting in low light. You can capture usable images when light is scarce, without resorting to extremely slow shutter speeds or opening your aperture to its widest.
- Helps maintain shutter speed. You can stick to the standard 180-degree shutter rule (shutter speed at double your frame rate, e.g., 1/48th for 24fps) even in dim environments.
Cons:
- Increased digital noise. This is the biggest drawback. The amplified signal brings up more unwanted digital noise, which can appear as graininess, speckles, or colored blotches.
- Reduced dynamic range. The amplification process can effectively crush shadow detail or blow out highlights more easily. The usable range between your darkest and brightest points shrinks.
- Potential color shifts. Pushing ISO too high can sometimes subtly shift color accuracy, making post-production color correction more challenging.
In our research, aggregate user feedback on cameras without advanced noise reduction processing indicates that going even one stop above native ISO can introduce noticeable noise, while two or three stops higher often requires significant noise reduction in post, which can soften the image.
When to Consider Lower-Than-Native ISOs
Conversely, shooting at an ISO lower than your camera's native setting is typically done in very bright conditions. Some cameras are designed with excellent low-ISO performance, offering even cleaner images than their native setting.
Pros:
- Maximum image cleanliness. In many cameras, the absolute lowest ISO setting (often ISO 100 or 50) provides the cleanest possible image with the least noise.
- Extended highlight headroom. You can often capture brighter highlights without them "blowing out" or losing detail, as the signal isn't being amplified.
Cons:
- Requires more light. You'll need significant ambient light or strong artificial lighting to expose properly at very low ISOs.
- Potential for highlight clipping. If the light is extreme, even with a low ISO, you might clip highlights if your exposure isn't managed carefully.
For example, some camera manufacturer specifications for their flagship models highlight an extended dynamic range when shooting at their base ISO of 64 or 100. This allows for extreme flexibility in post when dealing with very high-contrast scenes, such as shooting outdoors on a bright sunny day. The goal is to balance exposure with the capabilities of the sensor at each ISO level.
Mistakes to Avoid When Choosing ISO for D-Log
Getting the ISO wrong for D-Log footage can lead to frustrating hours in post-production trying to fix what could have been avoided at the source. A common pitfall is assuming all ISO settings are created equal, or that a slightly higher ISO is always acceptable if you don't have enough light. Many users mistakenly believe that noise can simply be "cleaned up" later without consequence.
While noise reduction tools are powerful, they are not magic bullets; aggressive noise reduction can smooth out desirable details, leading to a "plastic" or "painterly" look that detracts from the footage's realism.
Another frequent error is not confirming the camera's native ISO before shooting. Relying on default settings or guessing can lead to suboptimal results. For instance, shooting D-Log at ISO 1600 when your camera’s native ISO is 800 means you’re already introducing more noise than necessary from the outset.
This is compounded when users don't account for light changes. If you've set your ISO for a dimly lit scene and then the light significantly increases, you might be tempted to simply underexpose or leave the ISO high, rather than adjusting your shutter speed or aperture, leading to a noisier, less controlled image. Always aim to expose correctly at your native ISO first.
Expert Tips for Optimizing ISO in D-Log Workflows
To truly master your D-Log footage, integrating specific practices can make a world of difference. Prioritizing exposure at your camera's native ISO is non-negotiable for the cleanest possible signal. If shooting conditions demand a higher ISO than native, consider using a variable ND filter to allow for slower shutter speeds in bright light, which can sometimes be a better solution than a harsh ISO jump.
Always review your footage at 100% magnification on a calibrated monitor after shooting to accurately assess noise levels before you commit to extensive color grading.
Furthermore, understanding your camera's specific Log profile is crucial. While we're focusing on D-Log here, different Log variants from various manufacturers (like ARRI LogC, Sony S-Log, or Panasonic V-Log) have different native ISOs and noise characteristics. ARRI's technical documentation for their cinema cameras, for example, details specific recording formats and the ISOs that best preserve image quality for each.
As of 2026, the principle remains: know your tool, know your light, and set your ISO accordingly to maximize the data you capture.
Frequently Asked Questions About D-Log ISO
What is the native ISO?
The native ISO is the base sensitivity setting for a camera's image sensor where it performs at its best, producing the least amount of digital noise and the widest dynamic range for a given color profile.
Can I shoot D-Log at any ISO?
While you technically can set your camera to any ISO, shooting away from the native ISO will introduce trade-offs like increased noise or reduced dynamic range, which can negatively impact your footage and color grading capabilities.
How do I know if my footage is too noisy?
Look for graininess or speckling, especially in the darker areas of your image, when viewed at 100% magnification on a calibrated monitor. If you notice these artifacts, your ISO may have been too high, or the lighting conditions were too challenging for the chosen ISO.
Does shutter speed affect ISO choices for D-Log?
Yes, shutter speed is a key exposure tool. In bright conditions, if you can use a slower shutter speed without motion blur issues, you might be able to use a lower ISO than you otherwise would, preserving cleaner footage.